Saturday, November 29, 2014

Tutorial: Daily Dolly Eyes For Monolids

Here is a simple dolly eye look for monolids/Asian eyelids that's not too overbearing so that it can be worn daily. It makes the eyes look round and cute like dolls :3


If you would like to find out how I did this look, keep reading! Prodcuts I used at the end!


Step 1: Line the upper lid.
On a primed eye, outline your upper lid with gel eyeliner in a slightly rounded shape while your eyes are open, and extend the end following the curve of your eye. Avoid putting any liner near the inner corner.


Then fill it in.


Step 2: Apply lower mascara as a guideline.
Here, I applied a tiny bit of mascara to the center of the lower lashline, which we will use as a guide for the lower shadow/liner. It will also serve as the continuation of the liner we will use later, because we don't want to fully line the bottom lid!


Step 4: Apply shadow to the lower lashline.
Using an angle brush, apply a light brown eyeshadow from the edge of the eyeliner to the beginning of where we applied the mascara.


This doesn't have to be perfect, as it also serve as a guideline/we will go over it again later.

Step 4: Apply the bottom liner.
Using a tiny stiff brush and a teensy bit of gel eyeliner on the tip, go over the eyeshadow you just applied in a neat (as possible :P), thin line, extending from the beginning of the mascara to the upper liner. (Go around and not in the waterline, as this will make the eyes appear rounder.)


You want to leave a space between the liner and your waterline, but you want it to not look too unnatural, so don't make it too straight or harsh!

Step 5: Reapply eyeshadow.
Using the angle brush, apply the light brown eyeshadow to the upper lid and lower lid lightly.


Step 6: Apply mascara.
Mascara on your natural lashes adds a sweet touch, just don't put too much! Find out how I apply mascara here.


Done!

Products used:
Small angle brush
Small hard brush (came w/ gel liner)
Maybelline Eyestudio Gel Liner in Blackest Black
NYX Eyeshadow Single in ES06 Dark Brown (like light brown)
NYX 10 Color Eyeshadow Palette in Champagne and Caviar (just used for shimmery flesh tone)
Eyelash curlers (Revlon & Daiso)
Maybelline Define A Lash Mascara Lengthening in waterproof
Maybelline The Falsies Mascara in waterproof
Too Faced Shadow Insurance Primer

Friday, November 28, 2014

Boost Your Confidence By Changing 1 Thing In Your House

As a kid, I wasn't the prettiest. But looking back, I saw myself as worse than I could have. Recently, I've realized one thing that greatly contributed to it...

Lighting.

That's right. Every time I looked at my reflection, I could see every imperfection in that bathroom mirror highlighted - parts of myself that most likely weren't even visible when going to the school building or even just after stepping out of the bathroom!

My current bathroom had a couple bulbs go out, and one of them were replaced with a super bright fluorescent bulb. That's when a lightbulb went off (ha, ha) and I realized, if you want good light when you're taking photos, why not have good light where you see yourself daily?

Mirror pics are usually closer to the way we see ourselves, aren't they?

Your bathroom lighting could be affected by a number of things: type, number of bulbs, location, and amount of outdoor light seeping in. We should be accepting of our superficial imperfections because you're beautiful the way you are. My suggestion would be to adjust the lighting of your mirror in a way that feels flattering to you. By no means does it have to be glamorous movie lighting, but you deserve to see yourself as pretty as you look at your reflection every morning! :)

xo San

Sunday, November 23, 2014

Pink Lipstick Comparison & Swatches

A couple years ago, I was on the hunt for the perfect pink lipstick when I was super into gyaru makeup, which is the reason I bought all these lipsticks in the first place ><. These are the ones I have accumulated and I have gathered them for your comparison :)

Listed in order from left to right:
Revlon Color Burst 080 Strawberry Shortcake
Sephora Lip Attitude Glamour G05 Pink Caress
Rimmel London Moisture Renew 220 Pink Chic
NYX Lip Smacking Fun Colors 504 Harmonica
Revlon Matte 002 Pink Pout


Revlon Color Burst 080 Strawberry Shortcake, Sephora Lip Attitude Glamour G05 Pink Caress, Rimmel London Moisture Renew 220 Pink Chic, NYX Lip Smacking Fun Colors 504 Harmonica, Revlon Matte 002 Pink Pout
swatches, respectively

And here they are!

Revlon Color Burst 080 Strawberry Shortcake
I like these quite a lot, because they give a slightly opaque tint of pink! The only downside is that your lips have to be well-moisturized or it will be a bit flaky-looking, and its lasting power is so-so.

 Sephora Lip Attitude Glamour G05 Pink Caress
My first impression of these wasn't too great, because I felt it was too sheer to have an effect, but I do enjoy it's slight tight and moisturizing feel and look!

 Rimmel London Moisture Renew 220 Pink Chic
One of the first ones I got, which I fell in love with right away! It's another one of those that doesn't look too great unless you have well-moisturized lips, but it has a quite opaque, albeit quite glossy, finish.

NYX Lip Smacking Fun Colors 504 Harmonica
When I got this, I didn't realize how frosty the color was. It is meant to be shiny and it comes off as a bit metallic, and it's a bit too light and sparkly for my tastes.

Revlon Matte 002 Pink Pout
I got this lipstick years ago, when I didn't wear lipstick. I tried it once and was done with it, haha. I do love matte makeup, but this just didn't look great on my then-dry lips, and is a little splotchy even when they are smoother. It's color payoff is alright though.

finally, bare lips for comparison

Have any perfect pink lipsticks you've come across? Feel free to let me know, I'd love to hear your experiences with them! ;*

Friday, November 21, 2014

How To Eat Healthier

People often think I am anorexic or dieting. In reality, I am trying to be health-conscious. As a child, I ate like a child, not knowing any better. Whatever cookies and chips I could get my hands on. Not so bad when you're six-years-old (besides the poor eating habits it may breed), a bit worse when your metabolism slows down and you start realizing that cardiovascular disease is one of the top killers. All in all, teaching us as kids how to read nutrition facts labels was useful!

And to maintain healthier eating with the knowledge of the portions of all sorts of fats and sodium you are consuming, I have gathered these things that I try to follow to be and feel healthier! You literally are what you eat, since your body breaks down the food into its elements, and less of the bad stuff helps you feel less tired thoughout the day. And healthier food gets you more energy! Hoorah~!


Therefore I present to you how I "diet" aka how to eat healthier, and not consume so much junk:

1. Shop consciously.
Most obvious of all, don't buy junk food. If you don't have it stored at home, there's no temptation to eat it. You're more likely to grab a healthier snack if you get hungry if those are what you have on hand. Make a shopping list of the foods you mean to get beforehand so you don't grab things off the shelf that you know you'll regret later.

If you do need to grab some random foods, make sure you look at the labels. Does it have excessive fat? Sugar? If the answer is yes, look for a healthier alternative.

2. Watch your portions.
Make sure that when you eat, don't eat until you're full. Prepare a set amount you know will keep you satisfied and don't overeat, perhaps by using a certain bowl or plate. This is something I have to constantly remind myself about, because I think I need (or want lol) to eat more when I don't have to.

3. Eat to avoid hunger.
Weird concept, right? In essence, don't starve yourself - if you don't ever feel hungry, you're less likely to overeat because you think you need more food. Have a three hour long class? Bring something healthy to eat beforehand to stave off any hunger pangs that might cause you to snack during class or binge later.

Personally, when I had to be at college for the whole day basically, I would eat a granola bar before every lecture, which kept me perfectly satisfied until mealtimes. FiberOne bars are my love.

4. Eat when you're hungry. 
Another strange thought. But just eat a little - hungry before bed? Eat a small snack (and if you've only bought healthy things to store in your pantry as I've mentioned earlier, it shouldn't be too bad either), and not a whole meal. Otherwise, it might imbalance your appetite for following days.

Furthermore, when you're going to have the occasional not-so-great food, fill up on healthier food beforehand so you'll feel more full after having those empty calories that you know would surely leave you hungry for more.

5. Keep track.
If you grew up on the school system I have, you've recorded everything you've eaten for at least a few days as an assignment. I've found that doing this at least a few times a week can be insightful to what you're putting into your body. You know what you should cut down on, and perhaps more importantly, what you are missing. There are a lot of essential vitamins and minerals that I lacked in, and most likely contributed to my perpetual college tiredness.

6. Do things you know makes you want to eat less.
No one wants to eat when their teeth are minty and fresh. If you feel like eating just for the sake of eating, but don't wish to, brush your teeth. Wear a retainer if you have one. Chew some gum.

7. Keep a schedule.
Eat only at times you assign yourself (maybe all mealtimes and a snack between each one), and at all other times, keep yourself busy and away from tempting food.

.8. Stay hydrated.
It's often said that you can mistake thirst for hunger - and drinking water is good for you! I like to carry a water bottle with me at all times so I can grab a drink first, instead of a snack.

9. Inform, therefore condition yourself.
If you know the effects, both negative and positive, of different foods and ingredients, you're more likely to gravitate to foods that you know are healthy and don't have detrimental effects on your health. Read up on your foods, but make sure they're from reliable sources.

10. Be vegetarian.
An extreme, but do you know how much fat is in a regular hamburger versus a vegetarian hamburger? Yeah. It's awesome, and tastes awesome. And you're not eating dead animals. Win-win. Just remember to supplement your nutrients so you don't lack anything your body needs!


These are things I've known before but definitely had to refresh in my mind, as I'm living away from home for the first time and have to make all of my choices, including that of my daily diet.

A healthier lifestyle shift is going to be more beneficial rather than a temporary fix that isn't going to last or make you very happy. If you're going to "diet", make it a change to your diet and eating habits!

Monday, February 17, 2014

Magical Thrift Store Haul

I've been visiting thrift does since I was very small, just looking at knickknacks and abandoned beanie babies. Not until high school (when I slowly began caring about style) did I realize the potential for them to have clothes at a more reasonable price!

One weekend on a trip to the city I felt like I hit gold in terms of cute clothes at low, low prices. I could get 5 coats that hit my fashion sweet spot for the price of one new one at the mall, I was quite pleased as I haven't gone proper shopping in ages! Being a more broke college student does that I suppose, haha.

I thought I'd share what I got. I don't remember the exact prices but these were somewhere around $5 each, and one about $10. (I thought the prices were already low, but everything was apparently half-off that day! Double win!)


This is not including the couple of brand-name hoodies I got, for like, $3. No way I'm paying $50 for an Abercrombie name sewn onto a sweater, but this, I'm more okay with.

Wednesday, January 29, 2014

Achieving Ash Blonde/Brown Hair

Ash blonde is probably one of my favorite hair colors! The hints of silver with brown is such a soft tone that is really pretty! But, it is a big change in the care for your locks as well as the color, and to upkeep the tone takes some time and money, too! I once had and maintained a hair color that was close as I could get to ash blonde, and if you're interested in finding out what I used to achieve it, keep reading!

My ash blonde hair:


Here's what my hair looked like before:


One Beyond the Zone bleaching kit later...


and after bleaching!
I thought this color was so cool, now I can't stand a day with it, lol.

Bleaching:
You can bleach your hair with any bleaching powder + developer (I use 20-30 volume now, the kit I first started with was 40 vol). Make sure to get both of the items! The powder usually comes in a tub, and the developer in a shampoo-like bottle. These two products can be easily found at Sally's Beauty Supply if you live in the US, or any other beauty supply store that stocks hair products, and shouldn't exceed $25 most likely. You mix the powder with the liquid developer as it instructs you on the bleaching bin, and you apply the paste you've created to your hair evenly, then watch the clock. This is important, because if you over-develop, your hair will be... well, over.

So be warned, once you bleach your hair, it will be a lot thinner and will break easier, resulting in split ends and can result in frizzier hair. Bleaching strips your hair, literally, which is why it can be stringy and like elastic post-bleaching. I feel that bleached hair requires more care and attention than normal, so only do so if you are ready for the time and commitment! If you don't take precautions with bleaching hair, many a time I see people ending up chopping their hair off to "start over".. I once have chopped my hair off to shoulder length to start a healthier phase of my bleaching journey when I had bleached it many a time. I hated it :P

It's a good idea to give your hair a rest after the bleaching and not add more chemicals to it for a few days or so, so it's not a bad thing to do this when you know you'll be home for a while. A deep conditioning session would be lovely for your hair, too! I have tips for bleached hair here!

Dying:
Now, after you've successfully lightened your hair, you can dye/tone it to the shade you desire. I have used both the boxed dye and liquid dye + developer from Sally's to achieve the ash color. I have used:


L'oreal Paris Superior Preference in 7 1/2 A Medium Ash Blonde - $9-11 USD


Wella Color Charm Liquid Permanent Hair Color - $5-6 USD
(I got it in 7# colors, such as the links below)

Personally, these results would last about 2 weeks before fading back to a brassier tone. Depending on how often you wash your hair, results may vary.

Good luck! (^-^)/

Monday, January 20, 2014

How Much Makeup Is Too Much Makeup?

In my personal experience, there was a point in my becoming-a-teenager phase where any hint of makeup at all was the most attractive thing ever. Perhaps I continued to think this way because I wasn't permitted to use any of it until I was fifteen, which, looking back, was still pretty early. And like I've written so many times before, I became reliant on makeup and the appearance providing me with confidence.

But after my abrupt halt in makeup usage, being exposed to so many photographs of natural style models, and then meeting and becoming close to people who didn't find makeup so attractive (and people who did), it made me realize how it felt like the makeup I would wear when I would actually try (lol) really did feel like too much for me at that point. Not only that, but I felt prettier when I wore my minimal ten minute makeup routine face. (Which is very necessary when you get up at 5am for commute.) Fifteen-year-old me would have never believed that in a hundred-- well, four years haha.

So all in all, it's however much makeup you think is right for you and what makes you happy. It changes from person to person and experience!

Saturday, January 18, 2014

How To Get Straighter Brows

Straight brows are very prevalent among Korean models especially. They give a very youthful look and adds more focus to the eyes in my opinion! Larger foreheads seem to be popular in Asian countries, and straight brows also give more emphasis to the forehead.

I used to be confused about how to make my eyebrows straighter with the eyebrows that I have, as they always ended up rounded or some other unwanted shape. But with experience I realized it was just a matter of tweezing and filling spaces that might have been forgotten, such as the ends and tops of the brows. I by no means have perfect completely straight brows! But this is the process I use to make them straighter.

Here's the straightest I got my brows last summer using these methods huehue.

Minimally, all you need is a hair removal tool (tweezer or razor) and way to fill in your brows (shadow or powder or pencil)!

Products used:
- Revlon tweezer
- small Razor (Daiso brand, comes in set)
- NYX Eyeshadow Single in Dark Brown
- small angle brush
-or, brow pencil
-concealer (optional)
-white eyeliner pencil (optional)


Step 1: Figure out the shape you're going for.
Here are unkempt brows. Comb them if necessary to make the hairs go in the direction they usually grow. I find the naturally straightest area to work with and decide the relative thickness. If you'd like, you could even draw with white eyeliner around the area to make things easier.


Step 2: Fill in the areas that are lacking.
Within your imaginary lines, fill in the spaces that lack brow hair with the small angle brush and eyeshadow/brow powder (or eyebrow pencil) that is closest to your brow color.

Pictured below are the general areas that I would fill in.


Step 3: Remove the unwanted areas.
Using the areas you just filled in as a guide, remove the areas of hair that protrude from the straight imaginary area of your natural eyebrow that you planned out earlier. You can do this using a razor, which is especially helpful the first time you attempt this because it gives a much straighter edge, but once you know the shape you're going for, using a tweezer makes longer results.


Step 4: Conceal.
I didn't use it here, but if you wish to, you can use a concealer above and below the brow to make them appear even straighter!


Done!

I don't want to deviate too far from my natural brow shape, but overall they are much straighter than before. I hope this helps somebody :)

Friday, January 17, 2014

How To Lighten Your Brows

When I first started dying my hair lighter, something had to be done about my clashing black brows. They did not match at all and the clashing color drew too much attention to them. If you've ever been in the same situation, or just wish to get lighter brows, here are a few of your options!


1. Trim.
Using a small comb or clean mascara wand, comb your brow hairs upwards and trim with scissors or a razor. When the hairs are less dense, it's easier for them to appear lighter. Be very careful though! The only thing worse than clashing brows are brows with spots you accidentally hack off :P If your brows are thick/long and you wish to use the following two to three methods, then you probably want to do this first!
e.l.f brow comb, razor from Daiso
2. Brow powder.
There are powders that are specifically made for certain hair colors, which are quite handy and saves time with having to choose the right color on its own! However, you can also use an eyeshadow, just make sure it's not too light or dark, and use a small angle brush to apply. This doesn't change the color much though unless you've trimmed them first. Powder is great for a natural look!

NYX Eyeshadow Single in ES06 Dark Brown & small angle brush from Walmart

3. Brow pencil.
Pencils are great for a precise arch, and altering the color as well! As long as you work in short, light strokes, you can change your brow color without it looking too harsh. Again, trimming first is probably best if you want to use solely this method.

Revlon Brow Fantasy Pencil in Brunette

4. Brow mascara.
 It coats your brows with your desired color. Personally, I haven't used this product much, but I do hear good things about it. If you don't want the commitment of bleaching your brows, this is your thing to try. I've only tried the gel side of the brow pencil I have, and it's also a quick way to lightly fill in sparse areas with color!
Revlon Brow Fantasy Pencil in Brunette, gel side
5. Bleach.
My personal favorite is to simply bleach your brows using a facial bleach kit like those shown below. (Don't use a hair bleach though, this is probably really damaging if it gets in your eyes and may be too harsh for your skin!) It's the quickest way to lighten your brows with results that last quite a while - around a month, in my case. They wouldn't make your brows that bright, golden, bleach blonde like I used to think... As long as you don't leave it on for too long! For me it gives a light brown color. 

All this method requires is following the instructions which typically consists of merely  mixing together the bleach and activator, applying onto your brows, waiting for ~10 mins, then washing off!

Surgi Invisi Bleach from Sallys & Sally Hansen Creme Hair Bleach

Here's an example:

A month or so without bleaching. Black regrowth is prominent on the right side and tops.


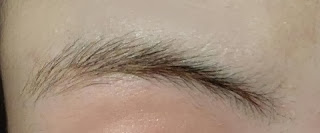
Post-bleaching! Much lighter.